
[WPF] WPF DataGird(데이터그리드) EventTrigger 사용방법
- C#/WPF
- 2021. 4. 4. 11:49

안녕하세요.
오늘은 WPF에서 DataGrid 사용하는 방법에 대해서 알려 드리려고 합니다.
그 중에서도 MVVM 패턴으로 데이터 바인딩 된 DataGird 컨트롤을 EventTrigger를 이용하여 View, ViewModel 이벤트들을 어떻게 다루는지에 대해서 알려 드리려고 합니다.
이벤트를 다루는 방법들은 여러가지 방법들이 있지만, 저는 그 중에서도 제일 간단한 방법 중 하나인 EventTrigger를 이용해서 ViewModel에서 View의 이벤트를 다뤄 보도록 하겠습니다.
그럼 먼저 EventTrigger를 사용하기 전에 WPF에서 아래와 같이 “Interactivity” NuGet 패키지 하나를 설치해 주시기 바랍니다.
Interactivity NuGet 설치
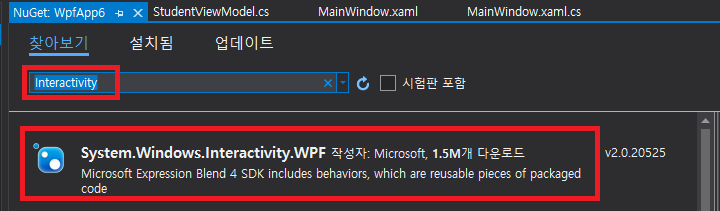
위와 같이 Interactivity 입력하셔서 NuGet 패키지를 설치해 주시기 바랍니다.
그리고 MainWindow.xaml에 아래와 같이 2개의 네임스페이스를 추가해 주세요.
네임스페이스 추가
|
1
2
|
xmlns:i="clr-namespace:System.Windows.Interactivity;assembly=System.Windows.Interactivity"
xmlns:ei="http://schemas.microsoft.com/expression/2010/interactions"
|
cs |
그리고 이제 DataGird에서 MouseLeftButtonUp 이벤트를 EventTrigger 를 통해서 다뤄보도록 하겠습니다.
예제 코드는 다음과 같습니다.
MainWindow.xaml
|
1
2
3
4
5
6
7
8
9
10
11
12
13
14
15
16
17
18
19
20
21
22
23
24
25
26
27
28
29
30
31
32
33
34
|
<Window x:Class="WpfApp6.MainWindow"
xmlns="http://schemas.microsoft.com/winfx/2006/xaml/presentation"
xmlns:x="http://schemas.microsoft.com/winfx/2006/xaml"
xmlns:d="http://schemas.microsoft.com/expression/blend/2008"
xmlns:mc="http://schemas.openxmlformats.org/markup-compatibility/2006"
xmlns:local="clr-namespace:WpfApp6"
mc:Ignorable="d"
xmlns:i="clr-namespace:System.Windows.Interactivity;assembly=System.Windows.Interactivity"
xmlns:ei="http://schemas.microsoft.com/expression/2010/interactions"
Title="MainWindow" Height="450" Width="400">
<StackPanel>
<DataGrid
Name="uiDataGrid_Main"
AutoGenerateColumns="true"
IsReadOnly="True"
VerticalAlignment="Stretch"
HorizontalAlignment="Stretch"
ItemsSource="{Binding Students,
UpdateSourceTrigger=PropertyChanged}"
ScrollViewer.CanContentScroll="True"
ScrollViewer.HorizontalScrollBarVisibility="Visible"
ScrollViewer.VerticalScrollBarVisibility="Auto">
<i:Interaction.Triggers>
<i:EventTrigger EventName="MouseLeftButtonUp">
<ei:CallMethodAction TargetObject="{Binding}"
MethodName="DataGridSelectedCellClick" />
</i:EventTrigger>
</i:Interaction.Triggers>
</DataGrid>
</StackPanel>
</Window>
|
cs |
MainWindow.xaml.cs
|
1
2
3
4
5
6
7
8
9
10
11
12
13
14
15
16
17
|
using System.Windows;
namespace WpfApp6
{
/// <summary>
/// MainWindow.xaml에 대한 상호 작용 논리
/// </summary>
public partial class MainWindow : Window
{
public MainWindow()
{
InitializeComponent();
this.DataContext = new StudentViewModel(this);
}
}
}
|
cs |
StudentViewModel.cs
|
1
2
3
4
5
6
7
8
9
10
11
12
13
14
15
16
17
18
19
20
21
22
23
24
25
26
27
28
29
30
31
32
33
34
35
36
37
38
39
40
41
42
43
44
45
46
47
48
49
50
51
52
53
54
55
56
57
58
59
60
61
62
63
64
65
66
67
68
69
70
71
72
73
74
75
76
77
78
79
80
81
82
|
using System.Collections.ObjectModel;
using System.ComponentModel;
using System.Windows.Controls;
using System.Windows.Input;
using System.Windows.Media;
namespace WpfApp6
{
public class StudentViewModel : INotifyPropertyChanged
{
MainWindow ownerWindow;
public event PropertyChangedEventHandler PropertyChanged;
protected virtual void OnPropertyChanged(string propertyName)
{
if (PropertyChanged != null)
{
PropertyChanged(this, new PropertyChangedEventArgs(propertyName));
}
}
private ObservableCollection<Student> _student;
public ObservableCollection<Student> Students
{
get
{
if (_student == null)
{
_student = new ObservableCollection<Student>();
}
return _student;
}
set
{
_student = value;
OnPropertyChanged("Students");
}
}
public StudentViewModel(MainWindow win)
{
ownerWindow = win;
Students.Add(new Student { Name = "홍길동", Age = "20", Address = "서울" });
Students.Add(new Student { Name = "조길동", Age = "21", Address = "서울" });
Students.Add(new Student { Name = "아길동", Age = "22", Address = "서울" });
Students.Add(new Student { Name = "이길동", Age = "23", Address = "서울" });
Students.Add(new Student { Name = "유길동", Age = "24", Address = "서울" });
Students.Add(new Student { Name = "정길동", Age = "10", Address = "서울" });
Students.Add(new Student { Name = "김길동", Age = "20", Address = "서울" });
Students.Add(new Student { Name = "권길동", Age = "30", Address = "서울" });
Students.Add(new Student { Name = "임길동", Age = "40", Address = "서울" });
Students.Add(new Student { Name = "라길동", Age = "50", Address = "서울" });
}
public void DataGridSelectedCellClick(object sender, MouseEventArgs e)
{
for (int index = 0; index < Students.Count; index++)
{
DataGridRow row = (DataGridRow)ownerWindow.uiDataGrid_Main.ItemContainerGenerator.ContainerFromIndex(index);
if (row != null)
{
if (Students[index].Name.Equals("홍길동"))
{
SolidColorBrush brush = new SolidColorBrush(Color.FromArgb(200, 255, 0, 0));
row.Background = brush;
}
}
}
}
public class Student
{
public string Name { get; set; }
public string Age { get; set; }
public string Address { get; set; }
}
}
}
|
cs |
실행 결과
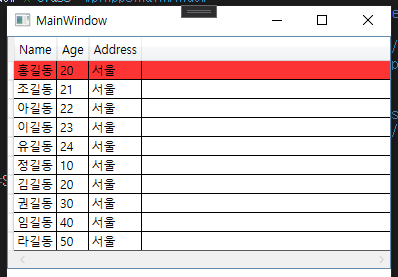
위와 같이 ViewModel에서 MouseLeftButtonUp 이벤트 핸들러를 선언해서 View에 있는 컨트롤의 이벤트를 다룰 수 있는 것을 확인할 수 있습니다.
감사합니다.^^
728x90
'C# > WPF' 카테고리의 다른 글
| [WPF] WPF Canvas 가운데로 (0,0) 중심 좌표로 만들기 (0) | 2021.04.04 |
|---|---|
| [WPF] WPF Canvas X축 Y축 반전시키는 방법 (0) | 2021.04.04 |
| [WPF] WPF DataGird(데이터그리드) 특정 Row 컬러 변경하기 (0) | 2021.04.04 |
| [WPF] MVVM 패턴 Button 컨트롤 선택된 버튼 배경색상 변경하기 (0) | 2021.03.21 |
| [WPF] WPF MVVM 패턴 적용하여 DataGrid 컨트롤 동적 컬럼 데이터 바인딩하기 (0) | 2021.03.04 |


