
[C# .NET Core] EFCore PostgreSQL CodeFirst 예제
- C#
- 2022. 11. 29. 19:59

개요
- 이번 포스팅에서는 .NET Core 앱을 하나 생성 후, PostgreSQL 와 EF Core 를 Code First 방식으로 연동하는 방법에 대해서 알려 드립니다.
도구 & 프레임워크
- Visual Studio 2022
- .NET 6
- PostgreSQL Docker & pgAdmin
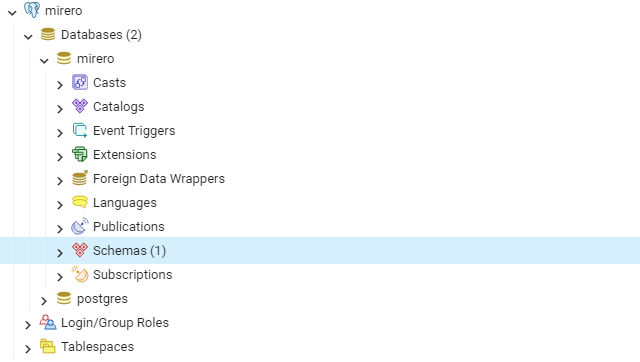
PostgreSQL 설치 및 pgAdmin 연동
- 제일 먼저 PostgreSQL 설치 및 pgAdmin 연동을 해야 합니다.
- 저 같은 경우에는 PostgreSQL 데이터베이스는 Docker 를 이용하여 실행해 주었고, pgAdmin 은 공식 홈페이지에서 설치 후 사용하였습니다.
- PostgreSQL 데이터베이스 docker-compose 내용은 다음과 같습니다.
version: "3.4"
services:
  db:
    image: postgres:latest
    container_name: postgres
    restart: always
    ports:
      - "5432:5432"
    environment:
      POSTGRES_USER: "beombeomjojo"
      POSTGRES_PASSWORD: "1234"
    volumes:
- C:\postgresql\data:/var/lib/postgresql/data- pgAdmin 설치 및 연동 방법은 다음 URL 을 참고하시면 됩니다.
- https://jobeomhee.github.io/posts/PostgreSQL-GUI-%EB%8F%84%EA%B5%AC/
ASP.NET Core 6 MVC Application 생성
- 먼저, 테스트를 진행하기 위해 Visual Studio 2022 를 실행 후,
ASP.NET Core 6 MVC Application프로젝트 하나를 생성합니다.

PostgreSQL EFCore NuGet Package 추가
- EF Core 를 사용하여 .NET 애플리케이션을 PostgreSQL 과 연결하려면 PostgreSQL 데이터베이스 용 .NET Data Proiver 가 필요합니다.
- 그러기 위해, NuGet Package Npgsql.EntityFrameworkCore.PostgreSQL 을 설치 합니다.

- 다음으로 기존 데이터베이스에 대한 EF 프록시 클래스를 생성하려면 EntityFramework Core Tools 가 필요합니다.
- EF Core 용 패키지 관리자 콘솔 도구를 가져오려면
Microsoft.EntityFrameworkCore.Tools패키지를 설치합니다.

- 지금까지 총 2개의 NuGet Package 를 설치하였습니다.

Model 생성
- 데이터베이스에서 테이블 역할을 하는 모델을 생성합니다.
- 테스트를 위해 Course, Student 2개의 Model Class 를 생성하였습니다.
namespace EFCore_CodeFirst_Example.Models;

public class Course
{
    public int CourseId { get; set; }
    public string CourseName { get; set; }
}

public class Student
{
    public int StudentId { get; set; }
    public string Name { get; set; }
}
ISchoolDbContext 인터페이스 작성
using EFCore_CodeFirst_Example.Models;
using Microsoft.EntityFrameworkCore;

namespace EFCore_CodeFirst_Example;

public interface ISchoolDbContext
{
    public DbSet<Student> Students { get; set; }
    public DbSet<Course> Courses { get; set; }
}
DBContext 작성
- EFCore 에서 Migration 을 진행할 때 반영하기 위한 더미 데이터 및 컬럼 정보 내역들을 정의하는 DBContext 관련 내용을 아래와 같이 작성하였습니다.
using Microsoft.EntityFrameworkCore;

namespace EFCore_CodeFirst_Example.Models;

public class SchoolDbContext : DbContext, ISchoolDbContext
{
    public DbSet<Student> Students { get; set; } = null!;
    public DbSet<Course> Courses { get; set; } = null!;
    public SchoolDbContext(DbContextOptions<SchoolDbContext> options) : base(options) { }

    protected override void OnModelCreating(ModelBuilder builder)
    {
        base.OnModelCreating(builder);
        builder.HasDefaultSchema("MireroStudy");

        builder.Entity<Student>().HasData(
            new Student { Name = "BeomBeomJoJo1", StudentId = 1 },
            new Student { Name = "BeomBeomJoJo2", StudentId = 2 },
            new Student { Name = "BeomBeomJoJo3", StudentId = 3 }
            );
    }
}
ServiceExtension 작성
- EFCore 관련 서비스를 모아서 Dependency Injection 주입하기 위한 Extension 을 다음과 같이 작성하였습니다.
using EFCore_CodeFirst_Example.Models;
using Microsoft.EntityFrameworkCore;
using System.Reflection;

namespace EFCore_CodeFirst_Example.Extension;

public static class DatabaseExtension
{
    public static IServiceCollection AddPostgreSQLDatabase(
        this IServiceCollection services,
        IConfiguration configuration)
    {
        services.AddTransient<ISchoolDbContext, SchoolDbContext>();
        services.AddDbContextFactory<SchoolDbContext>(options =>
        {
            options.UseNpgsql(configuration.GetConnectionString("PostgreDb"),
                    b => b.MigrationsAssembly(Assembly.GetExecutingAssembly().GetName().Name))
                .EnableSensitiveDataLogging();
        });

        return services;
    }
}
appsettings.json
appsettings.json파일에 DB 접속 성보를 사전에 정의하였습니다.
{
  "Logging": {
    "LogLevel": {
      "Default": "Information",
      "Microsoft.AspNetCore": "Warning"
    }
  },
  "AllowedHosts": "*",
  "ConnectionStrings": {
    "PostgreDb": "Host=localhost;Database=test;Username=test;Password=1234"
  }
서비스 등록
program.cs에 다음과 같이 EFCore 관련 Service Extension 을 등록하였습니다.
using EFCore_CodeFirst_Example.Extension;

var configuration = new ConfigurationBuilder()
    .SetBasePath(Directory.GetCurrentDirectory())
    .AddJsonFile("appsettings.json", false, true)
    .AddEnvironmentVariables()
    .Build();

var builder = WebApplication.CreateBuilder(args);

// Add services to the container.
builder.Services.AddControllersWithViews();
builder.Services.AddPostgreSQLDatabase(configuration);

var app = builder.Build();

// Configure the HTTP request pipeline.
if (!app.Environment.IsDevelopment())
{
    app.UseExceptionHandler("/Home/Error");
    // The default HSTS value is 30 days. You may want to change this for production scenarios, see https://aka.ms/aspnetcore-hsts.
    app.UseHsts();
}

app.UseHttpsRedirection();
app.UseStaticFiles();

app.UseRouting();

app.UseAuthorization();

app.MapControllerRoute(
    name: "default",
    pattern: "{controller=Home}/{action=Index}/{id?}");

app.Run();
마이그레이션 진행
- 이제 모든 준비는 마쳤습니다.
도구 -> NuGet 패키지 관리자 -> 패키지 관리자 콘솔을 실행 후, 아래 명령어를 입력합니다.Add-Migration InitializeDatabase명령어를 입력하게 되면, 마이그레이션이 정상 실행되는 것을 확인할 수 있습니다.
PM> Add-Migration InitializeDatabase
Build started...
Build succeeded.
Microsoft.EntityFrameworkCore.Model.Validation[10400]
      Sensitive data logging is enabled. Log entries and exception messages may include sensitive application data; this mode should only be enabled during development.
To undo this action, use Remove-Migration.- 마이그레이션이 정상적으로 되면, 다음과 같이 Migrations 디렉터리가 생성된 것을 확인할 수 있습니다.

Database 에 마이그레이션 정보 적용하기
- Migration 이 완료 되었다고 해서 Database 에 적용되는 것이 아닙니다.
- Database 에 최종적으로 적용하려면,
Update-Database명령어를 입력해 주어야 합니다. 도구 -> NuGet 패키지 관리자 -> 패키지 관리자 콘솔을 실행 후, 아래 명령어를 입력합니다.Update-Database명령어를 실행시켜 줍니다.
PM> Update-Database
Build started...
Build succeeded.
...
...
...생략
PostgreSQL 확인
- 최종적으로 Database 에서 Migration 정보가 정상적으로 반영되었는지 확인합니다.
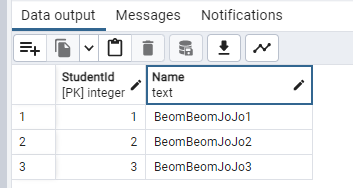
- 확인결과, Migration 정보가 정상적으로 반영되어 School, Course 2개의 테이블이 생성된 것을 확인할 수 있습니다.
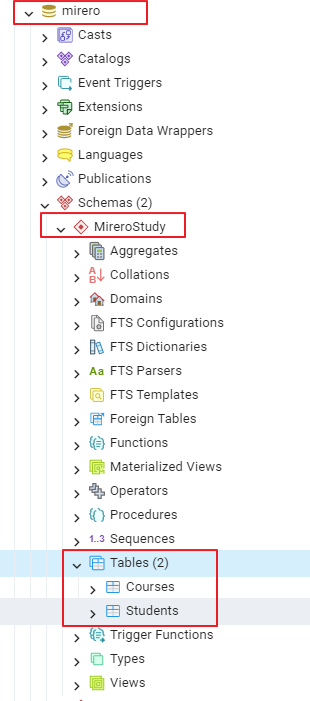
- School 테이블 같은 경우에는, 위에서 HasData 를 이용하여 미리 넣어 두었던 값도 같이 Insert 된 것을 확인할 수 있습니다.
728x90
'C#' 카테고리의 다른 글
| [C#] Console Porject Web API Project 변환하기 (0) | 2023.01.26 |
|---|---|
| [C#] .NET6 WorkerService Serilog 사용하기 (0) | 2023.01.26 |
| [.NET EFCore] EFCore Postgresql Database First 예시 (0) | 2022.11.26 |
| [C# 디자인패턴] Factory Method 패턴 (0) | 2022.11.01 |
| [C# 디자인 패턴] 재귀 제네릭을 사용한 Fluent Builder 패턴 (0) | 2022.10.31 |


