
[C# WPF] WPF INotifyPropertyChanged 이용하여 데이터 바인딩 하기
- 카테고리 없음
- 2020. 11. 3. 00:00

안녕하세요.
오늘은 C# WPF에서 INotifyPropertyChanged 인터페이스 사용 방법에 대해서 알아보려고 합니다.
INotifyPropertyChanged 는 인터페이스로써, Xaml에서 디자인한 폼에서 데이터의 변화 혹은 데이터를 가져올 때 사용하는 인터페이스입니다.
위와 같이 정의하니까 무슨 말씀이신지 이해하기 어려우실 수도 있을 거예요!
저도 매우 이해하기 어려웠지만.. 그냥 따라서 계속 쓰다 보니까 저절로 습득이 되니까 우선은 적당히 이해만 하시고 먼저 소스코드를 따라 쳐 보시면서 자연스럽게 익히셔도 괜찮으실 겁니다!
그럼 WPF에서 INotifyPropertyChanged 인터페이스를 사용하여 어떻게 데이터 바인딩을 하는지 예제를 통해서 보여 드리도록 하겠습니다.
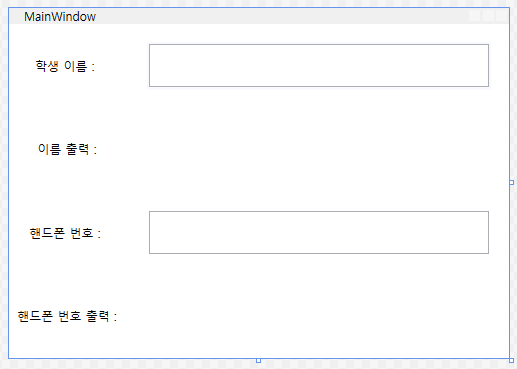
먼저 빈 WPF 프로젝트를 생성해 주시고 MainWindow.xaml과 UI를 아래와 같이 작성해 주시기 바랍니다.
MainWindow.xaml UI
MainWindow.xaml
|
1
2
3
4
5
6
7
8
9
10
11
12
13
14
15
16
17
18
19
20
21
22
23
24
25
26
27
28
29
30
31
32
33
34
35
36
37
38
39
40
41
42
43
44
45
46
47
48
49
50
51
|
<Window x:Class="Test.MainWindow"
xmlns="http://schemas.microsoft.com/winfx/2006/xaml/presentation"
xmlns:x="http://schemas.microsoft.com/winfx/2006/xaml"
xmlns:d="http://schemas.microsoft.com/expression/blend/2008"
xmlns:mc="http://schemas.openxmlformats.org/markup-compatibility/2006"
xmlns:local="clr-namespace:Test"
xmlns:ViewModels="clr-namespace:Test.ViewModels"
mc:Ignorable="d"
Title="MainWindow" Height="350" Width="500">
<Window.DataContext>
<ViewModels:StudentViewModel/>
</Window.DataContext>
<Grid>
<!--컬럼 생성-->
<Grid.ColumnDefinitions>
<ColumnDefinition Width="120"/>
<ColumnDefinition/>
</Grid.ColumnDefinitions>
<!--로우 생성-->
<Grid.RowDefinitions>
<RowDefinition/>
<RowDefinition/>
<RowDefinition/>
<RowDefinition/>
</Grid.RowDefinitions>
<Label Grid.Row="0" Grid.Column="0" Content="학생 이름 : "
VerticalAlignment="Center" HorizontalAlignment="Center"/>
<Label Grid.Row="1" Grid.Column="0" Content="이름 출력 : "
VerticalAlignment="Center" HorizontalAlignment="Center"/>
<Label Grid.Row="2" Grid.Column="0" Content="핸드폰 번호 : "
VerticalAlignment="Center" HorizontalAlignment="Center"/>
<Label Grid.Row="3" Grid.Column="0" Content="핸드폰 번호 출력 : "
VerticalAlignment="Center" HorizontalAlignment="Center"/>
<TextBox Grid.Row="0" Grid.Column="1" Name="uiTb_Name" Margin="20"
Text="{Binding Path=Name, UpdateSourceTrigger=PropertyChanged}"></TextBox>
<Label Grid.Row="1" Grid.Column="1" Content="{Binding Name, Mode=TwoWay}"
VerticalAlignment="Center" HorizontalAlignment="Center"/>
<TextBox Grid.Row="2" Grid.Column="1" Name="uiTb_PhoneNumber" Margin="20"
Text="{Binding Path=PhoneNumber, UpdateSourceTrigger=PropertyChanged}"></TextBox>
<Label Grid.Row="3" Grid.Column="1" Content="{Binding PhoneNumber, Mode=TwoWay}"
VerticalAlignment="Center" HorizontalAlignment="Center"/>
</Grid>
</Window>
|
cs |
위와 같이 작성하였다면, 이제 위의 Label과 Textbox 컨트롤에 데이터 바인딩할 Model과 ViewModel 클래스들을 작성해 주시기 바랍니다.
StudentModel.cs
|
1
2
3
4
5
6
7
8
9
10
11
12
13
14
15
16
17
18
19
20
21
22
23
24
25
26
27
28
29
30
31
32
33
34
35
36
37
38
39
40
41
42
|
using System;
using System.Collections.Generic;
using System.Text;
namespace Test.Models
{
public class StudentModel
{
/// <summary>
/// 학생 이름 Property
/// </summary>
private string name = string.Empty;
public string Name
{
get
{
return name;
}
set
{
name = value;
}
}
/// <summary>
/// 학생 번호 Property
/// </summary>
private string phoneNumber = string.Empty;
public string PhoneNumber
{
get
{
return phoneNumber;
}
set
{
phoneNumber = value;
}
}
}
}
|
cs |
StudentViewModel.cs
|
1
2
3
4
5
6
7
8
9
10
11
12
13
14
15
16
17
18
19
20
21
22
23
24
25
26
27
28
29
30
31
32
33
34
35
36
37
38
39
40
41
42
43
44
45
46
47
48
49
50
51
52
53
54
55
56
57
58
59
60
61
62
63
64
65
66
67
68
69
|
using System;
using System.Collections.Generic;
using System.ComponentModel;
using System.Text;
namespace Test.ViewModels
{
public class StudentViewModel : INotifyPropertyChanged
{
Models.StudentModel studentModel = null;
public StudentViewModel()
{
studentModel = new Models.StudentModel();
}
public Models.StudentModel StudentModel
{
get
{
return studentModel;
}
set
{
studentModel = value;
}
}
public string Name
{
get
{
return StudentModel.Name;
}
set
{
if (StudentModel.Name != value)
{
StudentModel.Name = value;
OnPropertyChanged("Name");
}
}
}
public string PhoneNumber
{
get
{
return StudentModel.PhoneNumber;
}
set
{
if(StudentModel.PhoneNumber != value)
{
StudentModel.PhoneNumber = value;
OnPropertyChanged("PhoneNumber");
}
}
}
//PropertyChaneged 이벤트 선언 및 이벤트 핸들러
public event PropertyChangedEventHandler PropertyChanged;
protected void OnPropertyChanged(string propertyName)
{
this.PropertyChanged?.Invoke(this, new PropertyChangedEventArgs(propertyName));
}
}
}
|
cs |
위와 같이 모두 소스코드를 작성하였다면, 이제 프로그램을 실행시켜 주시기 바랍니다.
실행 결과
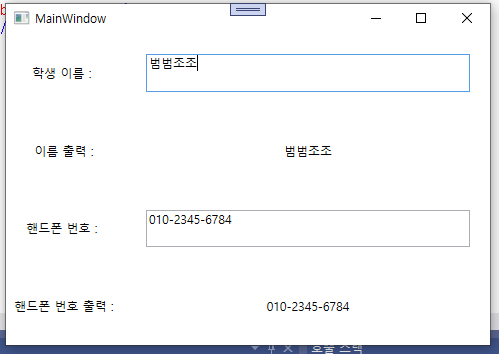
위와 같이 “학생 이름”, “핸드폰 번호”를 입력을 하게 되면 Label 쪽에서 바로 입력되는 것을 인지하고 그대로 출력되는 것을 확인하실 수 있습니다.
위와 같이 INotifyPropertyChanged 인터페이스는 향후 MVVM 패턴에서도 반드시 필요한 인터페이스로써 사용 방법에 친숙해 지시길 바랍니다! 저도..WPF 공부하면서 계속 사용하려고 연습 중이네요..ㅎㅎ
글 읽어 주셔서 감사합니다.^^